How to Replace UPS Batteries – Safe Removal & Installation Guide
UPS batteries wear out every 3–5 years, long before the UPS electronics fail. Replacing the battery restores full runtime and reliability without buying a new UPS. This guide shows you exactly how to replace UPS batteries safely and correctly.
1. Identify the Correct Replacement Battery
Most UPS units use sealed lead‑acid (SLA) batteries. You must match:
- Voltage (usually 12V)
- Amp‑hours (7Ah, 9Ah, 12Ah, etc.)
- Physical size (must fit the UPS battery bay)
- Connector type (F1 or F2 spade terminals)
| UPS Type | Typical Battery |
|---|---|
| Small desktop UPS (600–850VA) | 12V 7Ah or 12V 9Ah |
| Mid‑range UPS (1000–1500VA) | 2 × 12V 7–9Ah (wired in series) |
| Rackmount UPS | Multiple 12V batteries in packs |
Higher Ah = longer runtime, as long as the battery fits physically.
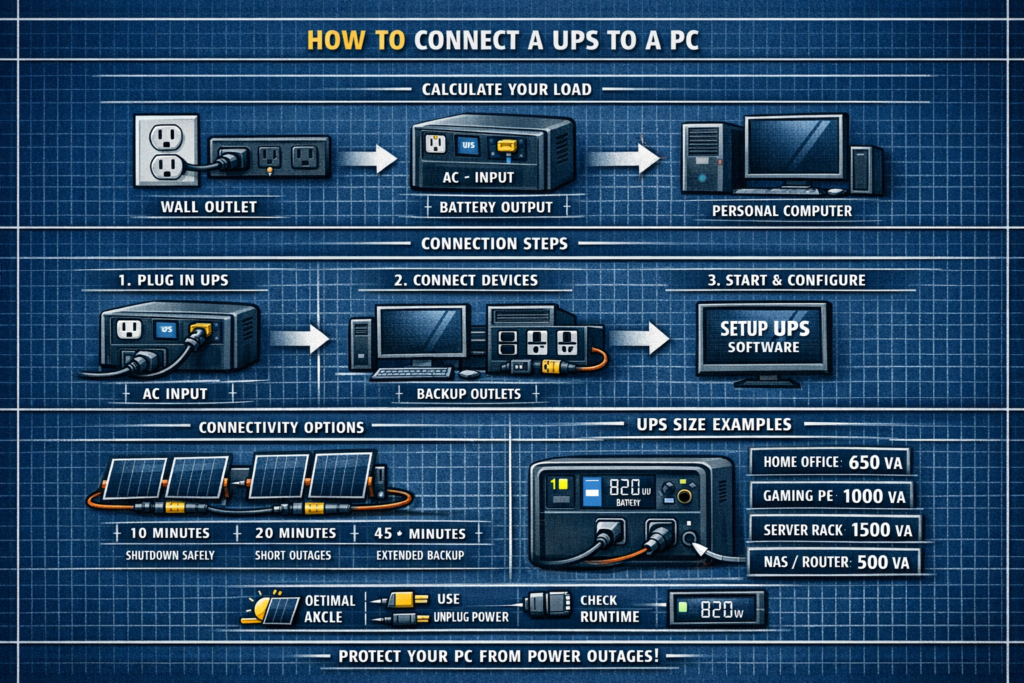
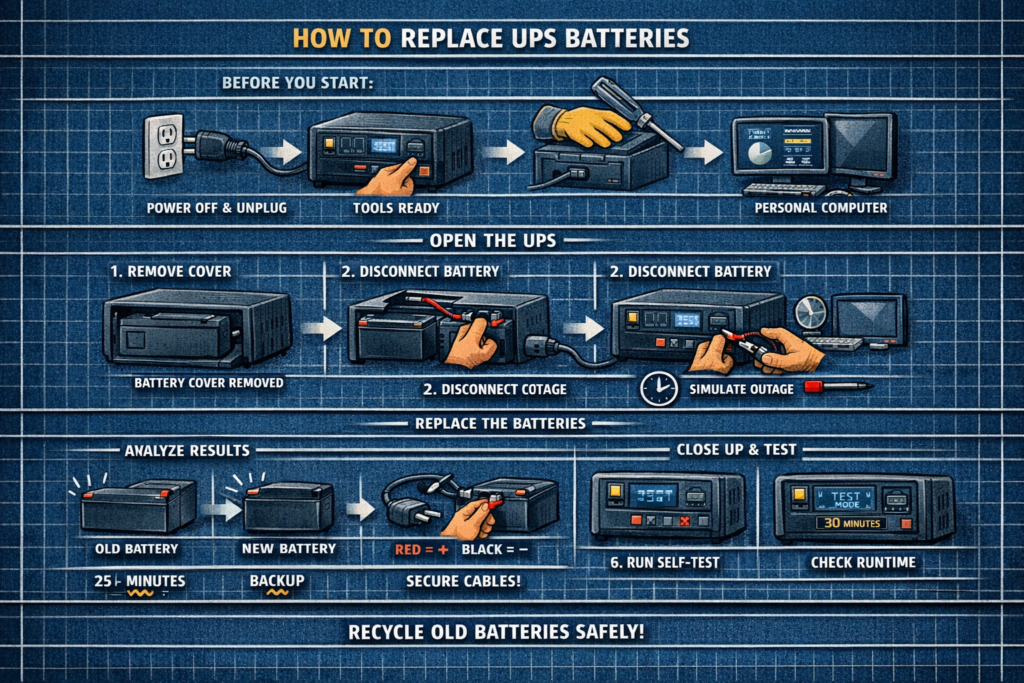
2. Power Down and Unplug the UPS
- Shut down connected devices (PC, NAS, etc.)
- Turn off the UPS
- Unplug the UPS from the wall
- Disconnect all devices from the UPS outlets
Never replace batteries while the UPS is plugged in unless the model explicitly supports hot‑swap (most consumer units do not).
3. Open the Battery Compartment
UPS battery bays are usually located:
- Behind a front panel
- Under a bottom cover
- Inside a slide‑out tray (rackmount)
Remove screws or tabs as needed. Keep track of hardware.
4. Disconnect and Remove the Old Battery
- Pull the battery out gently
- Disconnect the red (+) and black (–) spade connectors
- Note the polarity and wiring order
If the battery is swollen or stuck, do not force it—tilt and slide it out carefully.
5. Install the New Battery
Steps:
- Connect the red wire to + and black wire to –
- Ensure connectors are tight and fully seated
- Slide the new battery into the compartment
- Reattach the battery cover or front panel
Important: Never reverse polarity. It can damage the UPS instantly.
6. Charge the UPS Fully Before Use
Plug the UPS back into the wall and let it charge for:
- 8–12 hours for small UPS units
- 12–24 hours for larger units
Do not connect devices until the battery is fully charged.
7. Run a Self‑Test and Runtime Check
After charging:
- Press the UPS “Test” button or run a self‑test in the software
- Confirm no alarms or “Replace Battery” warnings
- Optionally perform a short runtime test by unplugging the UPS
If the UPS shuts off immediately, wiring may be loose or the battery is defective.
Signs You Installed the Battery Correctly
- UPS powers on normally
- No beeping or fault lights
- Battery icon shows charging
- Self‑test passes
When to Replace the Entire UPS Instead of the Battery
- UPS is more than 8–10 years old
- Electronics fail self‑tests even with a new battery
- UPS overheats or smells burnt
- Replacement battery costs more than 50% of a new UPS
FAQ: Replacing UPS Batteries
Can I use a higher Ah battery
Yes—if it fits physically and matches voltage and terminal type.
Do I need OEM batteries
No. High‑quality third‑party SLA batteries work fine.
How long do UPS batteries last
Typically 3–5 years depending on heat and usage.
Is it safe to replace UPS batteries myself
Yes—consumer UPS batteries are user‑replaceable and low voltage.
⚡ Explore More UPS Maintenance Guides
Pair battery replacement with proper testing, sizing, and runtime planning.
As an Amazon Associate, we earn from qualifying purchases. This does not affect our reviews or product recommendations.